If the multicooker does not turn on, this article can help you. We will tell you about how to repair a multicooker with your own hands and reduce the cost of this process.
The device and principle of operation of the multicooker

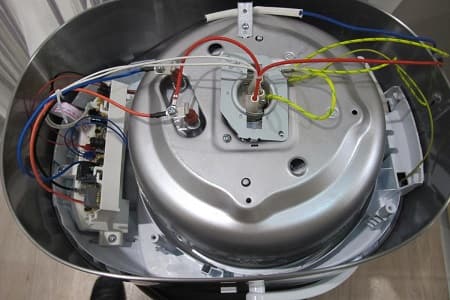
Before talking about how to troubleshoot multicooker, you should know that all home multicooker programs are subject to trade secrets of manufacturers. Multicooker is based on the installation of two sensors, thanks to which they understand what is required of them. Many masters suggested that the memory of the temperature and duration of individual operations and preset programs is embedded inside the board. Thanks to this data, the heating element (heating element) is being programmed. Sensors installed in the multicooker:
- Thermistor. It is installed on the main button of the device. Its dismantling is a rather painstaking task, for the reason that manufacturing firms are categorically opposed to repairs by self-taught and workshops, providing only warranty services. Company Redmond went even further, they filled all the terminals with a compound, making it impossible to dismantle the removable terminals.
- The second sensor is installed inside the cover. To gain access to it, you need to make a lot of effort, so we do not recommend that you take it up if you are not confident in your abilities. It is necessary to remove the required connector without paying attention to the compound, and then start the multicooker. If after turning on the multicooker does not work, then you have found the cause of the breakdown. In order to make sure of this 100%, it is necessary to measure the resistance coming from the sensor wires and the cover using a multimeter. In Redmond devices, the cables are located in the loop area under the removable cover. In order to make measurements, you need to unscrew the screw, then carefully remove the shield and remove the wiring from it, and then turn on the multicooker while measuring the resistance.
As follows from the above, for correct operation, the multicooker needs to take readings from two sensors. They transmit their signal to the control terminal of the board via two wires. Typically, the board itself is installed under the button bar. The next possible problem is the power supply. In order to make sure that it is working properly, it is necessary to connect the multicooker to the mains, if at least one of the indicator lights up, it follows that everything is in order with your power supply. Otherwise, it must be replaced.
Multicooker control is divided into mechanical and touch. If a mechanical control is installed in the multicooker, then microswitches are built into the printed circuit board. By counting the number of "closures", the microcircuit selects the related parameters for performing operations. It all functions with just one wiring.The beginning of the program execution process is carried out by means of transmission of just one signal. However, for this it is necessary to use a large number of function control boards installed in the multicooker. The signal is constant and required to turn the transistor on or off. Thanks to the voltage regulator, oversaturation cannot occur on the contact fields.
![]() See also - DIY multicooker repair
See also - DIY multicooker repair
Switching power supply
Let's talk in detail about how exactly it works. Its design includes a transformer, previously wrapped with electrical tape, so that the contact does not fall off, it is occasionally poured with a compound. In order to protect the transformer from input pulsations, an input filter is provided in the design. The multicooker itself does not create ripples. The transformer provides for the installation of two parallel windings. The use of two windings increases the reliability of the device.
If the multicooker does not turn on, it is necessary to measure the resistance of the transformer, it is not necessary to disassemble the device, since the relay is open when disassembled. The resistance between the plug and the input terminals must be low. The transformer is followed by a two-cycle rectifier of four diodes. After it, an additional filter from the largest resistor with a capacitor is provided in the power supply. Next, an emitter follower with a stabilizer and a resistor is installed, which is designed to select the operating point.
Be sure to pay attention to the small gap of the double wire, which is located in the fuse area. This part of the structure is responsible for supplying 220V current to the device by connecting to the relay. The main board is installed in the device with the elements down, if the current exceeds the limit value, the copper wire will simply melt and drain to the bottom of the unit, which is completely unprotected from this. If, when removing the main board, you notice this kurtosis, then this means that a short circuit has occurred somewhere inside the device. These damages can indicate the loss of performance of the multicooker heating element. But do not immediately take on the restoration of the jumper.
When measuring the resistance of the heating element, its operating value fluctuates around 30 ohms.
To test the functionality of the relay, you need to connect the device to the mains and turn on any of the preinstalled programs on the multicooker. If a click occurs while the device is turned on, then this is a signal that everything is in order, otherwise it is necessary to replace the relay and control circuit in stages. In order to diagnose a malfunction of the latter, it is necessary to apply voltage to the middle terminal (transistor) along the white wire. Then measure the output voltage. However, it is worth noting that manufacturers love to fill everything with compound, so be careful.
See also:
- Top popular multicooker from the manufacturer Polaris
- 5 best multicooker pressure cookers up to 5000 rubles according to customer reviews
- 5 best multicooker ENDEVER according to customer reviews
- 5 best Tefal multicooker of 2019
Consider the cases of a breakdown of a thermal fuse
What is a thermal fuse? This is a small cylindrical piece of wire, which in its external shape may remind you of a resistor. The device operates at 170 ° Celsius and the current ranges from 10 to 15 amperes, depending on the element installed. If one of the parameters is exceeded, the thermal fuse will burn out, which breaks the electrical circuit and suspends the operation of the device.
You could have set yourself the goal of making such a fuse with your own hands.First of all, it should not be denied that these products are easy to manufacture, but it follows from this that the price for them will be quite low. Secondly, it is advisable to install exactly the original elements. A factory copy has certain fixed characteristics, calculated initially in production, and a self-made copy may have characteristics that are different from it, which can lead to bad consequences. In the worst case, using a homemade part can end up on fire for you.
Thermal Fuse Replacement Process
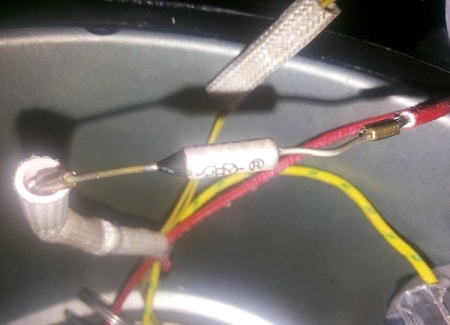
Getting to the location of this part is not too difficult; first you need to remove the saucepan from the cavity of the device. Under it you will find a mushroom-like metal element, the "leg" of which is pulled by a spring. Thermal fuses are located under it, usually several pieces are installed and covered with cambrics.
Cambric is a plastic conductive insulation element, in most cases white, used to protect the connection points of various components and areas.
In order to attach the element, a firing must be performed. It is strictly forbidden to use a soldering iron for these purposes. The heating element of the soldering iron will burn through the heat-sensitive element without much effort and difficulty.
To determine the integrity and performance of one or more elements, you must use a multimeter. It is not necessary to remove the part; after detecting a malfunction, eliminate it according to the above example.
A little about Redmond
Multicooker Redmond also has thermal fuses that serve to protect the device from overheating. These parts do an excellent job with the function assigned to them, but there is one very weighty BUT - they are able to do it only once. After that, you will have to contact the service center for the help of a specialist. Here is an extract from the Redmond warranty card: "a product with thermal and other damage caused by improper operation of the device is not a warranty case." Since it is not uncommon for owners to turn on devices without a saucepan, this is quite important to know. However, the device has a button that, in theory, should prevent the device from turning on without it, but it simply does not work at Redmond.
If you, through negligence or forgetfulness, did not put the saucepan in place and poured the ingredients there, poured the required amount of liquid and forgot to disconnect the device from the network, and then remove all moisture and food with paper towels, but the device stopped working, according to the manufacturers, wine will be lie to you. This is justified by the fact that getting into the cavity of the device of these things is not covered by the warranty, and you will have to pay for expensive repairs from your pocket.
![]() See also - Which multicooker is better to choose: Philips, Redmond or Moulinex
See also - Which multicooker is better to choose: Philips, Redmond or Moulinex
Device microcircuits
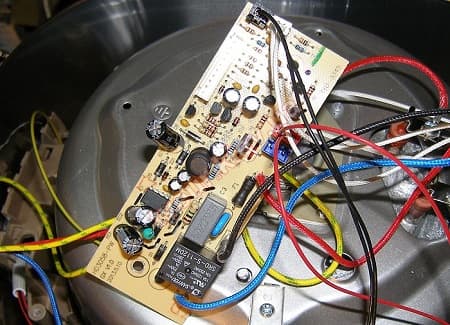
In typical models, two electronic boards are installed:
- Control board.
- Power board.
The second is located on the bottom of the device, but to get to the location of the first point, you will have to suffer a little and completely disassemble the device, while dismantling the inner cylindrical surface.
After you have disassembled everything, you need to examine the boards for the presence of:
- chips;
- blackened resistors;
- violation of solder seams;
- swollen capacitors;
- and carbon deposits.
If such defects are found, it is necessary to replace the elements with new ones. Restoring the damaged soldering should not cause you any special difficulties. It is necessary to carry out the process of restoring the tracks, by stripping them by means of tinning damage and zero sanding. You may need to add a few jumpers, which you can make from the resistor legs.After completing all operations, it is necessary to cover everything with varnish to ensure that the device is protected from leakage and exposure to oxygen.
![]() See also - How to use a multicooker correctly
See also - How to use a multicooker correctly
Output
If you have the multicooker does not turn on do not immediately carry it headlong to the service. All breakdowns are most often caused by improper operation of the device. If you use the device correctly, it can work for many years and make your life easier. In order to fix all the problems, you must adhere to the above instructions and with common sense, you can easily fix the multicooker. However, remember that if your device is under warranty, it is best to contact a service center.
See also:
- 5 best Philips multicooker 2019
- 5 best Moulinex multicooker
- 6 best Vitesse multicooker of 2019
- 15 best multicooker pressure cookers