Repairing vacuum cleaners, like other household appliances, is a common practice, since all appliances tend to break. The cause of breakdown is most often the wear of parts and the destruction of mechanisms. However, a breakdown of a vacuum cleaner does not always mean that you need to buy a new one, since it is quite possible to repair such equipment with your own hands.
The vacuum cleaner is rightfully considered the most popular piece of household appliances. Most housewives today can no longer imagine their life without a vacuum cleaner, since it significantly saves time and helps to keep the house clean and tidy.
![]() See also - How Do I Pick a Good Vacuum Cleaner at an Affordable Price?
See also - How Do I Pick a Good Vacuum Cleaner at an Affordable Price?
Troubleshooting
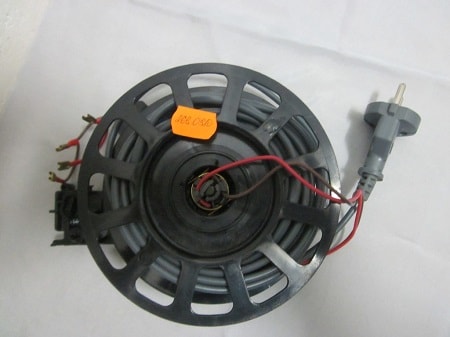
In most cases, the motor is the cause of the vacuum cleaner's failure. Such a breakdown occurs with almost all brands and models of the device, regardless of the manufacturer. By the characteristic signs and features of the device, you can diagnose a problem and try to repair the vacuum cleaner with your own hands.
- The first sign of a malfunctioning engine is a hum and the appearance of a dusty cloud during operation.
- Insufficient suction power or its complete absence indicates that the hose is out of order. Another sign that the tightness of the hose is broken is the quiet operation of the device. In addition to breakdown in the corrugation, the receiving brush can be damaged.
- Slow suction speed and drop in operating speed can be the result of bearing failure. Proof of failure of these particular components is the periodic restoration of operation in normal mode.
- Excessive hum during proper operation indicates that the engine is out of order. In most cases, malfunctions in the motor directly affect the strength of the air intake power.
![]() See also - DIY microwave oven repair at home
See also - DIY microwave oven repair at home
Disassembly instructions
Regardless of what is the cause of the malfunction, you need to know how to disassemble the vacuum cleaner in order to repair it yourself.
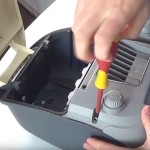
- It is necessary to remove the sealing grid, which is located under the cover of the dust container compartment. The cover is fastened with two screws or other threaded connections. Unscrew the screws using a screwdriver with a suitable section, clockwise.
- After removing the sealing grill, it is necessary to disconnect the control unit and the dust container cover.
- Depending on the configuration and model of the vacuum cleaner, the dust container is either simply removed or unscrewed. There is a garbage collection system under the dust collector, under which the body is connected to the motor.
- In order to get to the vacuum cleaner motor, it is necessary to separate the device body from the base. In some models, this becomes possible after unscrewing the countersunk screw hidden in the handle.
- The engine is protected by a special fabric gasket that is attached to the inlet of the intake hose. The gasket is removed and cleaned; if necessary, the gasket is changed to a new one.
- The wires supplying power are removed from the engine. In order to remove the wires, it is necessary to unscrew the screw clamps.
- Regardless of the manufacturer of the device (Bosch, LG, Electrolux, Rainbow and others), the first thing an experienced master will undertake is to check the bearing pairs (upper, lower). The bearings are responsible for the operation of the motor. The slightest signs of wear: irregularities, cracks - are a guide to replacing components. In addition to the bearings, it is important to check the integrity of the brush and motor armature.
- Dismantling the engine at home requires experience in carrying out such work. If there is no experience of such actions, it would be more correct to contact the service center for help.
- At the first stage of disassembling the engine, the casing is removed. You can remove it with a straight screwdriver, ruler or strip. The shroud adheres to the engine for a fee, so you can tap it lightly to disconnect. It is important to apply moderate force as it is extremely easy to damage the integrity of the casing.
- After the cover is removed, access to the impeller opens, which is held by built-in nuts. The nuts are additionally secured with glue, so a solvent will come in handy at this stage.
- There are four screws under the impeller that secure the motor. They are unscrewed one by one.
- When the motor has free access, check its performance. If violations or malfunctions are detected, the malfunctions are eliminated, the failed parts are replaced, and the assembly is carried out in the reverse order.
Repairing a vacuum cleaner with a wet cleaning function will be a little more difficult, since you will have to work with a water pump. The main task of the pump is to supply water to the dust collector, for this reason the pump is installed at its inlet. When repairing a washing vacuum cleaner, you must pay attention to disconnecting the pump.
![]() See also - Do-it-yourself multicooker repair
See also - Do-it-yourself multicooker repair
Frequent faults
When repairing a vacuum cleaner from companies: Hoover, Vitek, Samsung, Rowenta - it is recommended to check the power cord is working properly. You can check the integrity of the cord using a multimeter. The reason for the failure of the cable most often lies in the active use of the vacuum cleaner, in which the cable is frayed, twisted and broken. If such a breakdown is confirmed, it is enough just to shorten the cable to the required length or replace it.
Vacuum cleaners of the Dyson, Miele brand have a distinctive feature that manifests itself in the frequent failure of the filter. Low suction power is a sign of dirty filters.
It is very important to periodically clean and rinse not only the dust container, but also the filter. Timely maintenance of the filtration system of the vacuum cleaner is the key to its long-term and high-quality operation, which primarily depends on the serviceability of the engine.
![]() See also - How to repair an electric kettle yourself
See also - How to repair an electric kettle yourself
hello everyone, he himself did not know and was afraid. until I read a lot of advice here I took an ordinary screwdriver, a small 20 gram hammer that used to be hammered into mailboxes, turned it around, twisted it, decided that it was inserted tightly around the circumference, the edges were sealed technologically for accuracy and so that the non-open iron was inserted with a factory bias, but technologically does not affect the work.So: I found a corner where the casing is deepened to the stop, and from the opposite one it is less clogged (by the way, I thought that all this was twisted like a tin can), I took an ordinary household screwdriver with a plastic handle and not very sharp, you hit it in the gap between the common case and top cover, not strong blows, I would say slightly. the screwdriver falls through a little - you pick it up, next to it, and next to it, I took it off in 3 minutes. since soon she jumped out herself. my propeller and impeller crumbled, got hooked with ordinary home pliers on the broken-down propeller, and with a key, more precisely, with the end head (ratchet) in the opposite LEFT side (and not to the right), effortlessly unscrewed the nut by 11. I took a replacement for the propeller and a fixed plastic impeller from a similar deceased vacuum cleaner engine, which was thrown out entirely with the vacuum cleaner due to the fact that it sucked water from the former owners. good luck to take a picture did not have time I think and chewed so in detail. You never know what you can do till you try .
HELLO. HELP TO CONNECT THE WIRES TO THE POWER CONTROL MODULE OF THE CAMERON CVC 1050 1800 W VACUUM CLEANER ——- DRAWED DURING DISASSEMBLY BUT LOST THE WRITTEN — THERE 4 PINS WITH LABELS — XP 1 —XP 4 — XP ON THE ID — XP 1 —XP 4 — XP ON THE ID M2 — N —– L —————- WHAT WIRE AND WHERE I DON'T KNOW —- PROMPT, SPECIALISTS.