Flavors in the kitchen are always present in the preparation of food. Moreover, the steam that comes from pans and pots, scattering drops of fat, carbon monoxide released by a gas stove, and odors spread throughout the apartment or house, which brings some discomfort to the inhabitants and adds work to housewives in cleaning the kitchen. Installing a kitchen hood will help solve this problem and get rid of the inconvenience.
In order to install the hood, you need to answer several questions in advance.
Which kitchen hood model should you choose?
Nowadays, the market is overflowing with various models of hoods and in order to choose the most suitable one, several parameters must be taken into account. Most often, the owners of houses and apartments purchase them together with a gas stove so that they look harmonious and fit each other in size.
By the type of action, they are divided into two types:
- Recirculating
- Evacuees
Circulating hoods suck in air above the gas stove, pass it through special filters and release it into the room. It is worth noting that recirculating hood it costs an order of magnitude more, and, after prolonged use, it may not completely absorb all odors, and also, it does not absorb the excess heat generated by the gas stove. This is due to the fact that the filters that absorb odors become clogged and become inoperative.

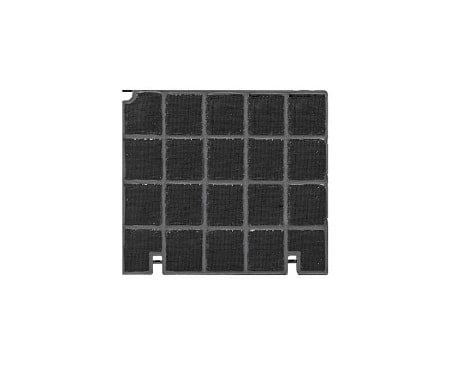
The evacuees, after absorbing air, immediately release it through the air duct to the outside. If you have a desire to convert an evacuation hood into a circulating hood, by simple manipulations, you can attach a carbon filter instead of an air duct, which are also used in gas masks.
At the place of installation, the hoods are divided into integrated, ceiling-mounted, tabletop, fireplace. The tabletop hood has a horizontal oblong socket, but it is, in most cases, used in professional kitchens, in conjunction with technological kitchen units. Installation of a fireplace extractor can be found in elite kitchens and, in most cases, it is designed individually. At the same time, it is a separate device that is not related to the rest of the kitchen furniture and it will be problematic to calculate the cost at the initial stages.
An island ceiling hood implies the presence of a false ceiling and is installed in a small area above the stove, on which several air intakes will be located. The costs for such a hood design are quite large, while it is almost impossible to mount it with your own hands.
For the average family, the ideal option would be to install a hood - a hood in the kitchen cabinet.This method is attractive in that it is possible to install an extractor hood in a kitchen of this type on your own, while minimizing the cost of purchasing the necessary parts and appliances, and not requiring a lot of professional tools.
See also:
- 5 best Shindo kitchen hoods according to customer reviews
- The 7 best LEX range hoods
- 8 best Bosch range hoods of 2019
- 8 best Elica range hoods according to customer reviews
- 8 best Gorenje kitchen hoods according to customer reviews
- 9 best ELIKOR cooker hoods
- Top 10 Hansa range hoods according to customer reviews
How do you ensure safety?
Despite all the paradox, the kitchen belongs to a place with increased danger. Therefore, before installing the hood, you need to clearly understand where the dangers can come from if you skip one of the steps or do not give it due importance. In particular, the hood is connected to electricity, and given the fact that moisture and fat settle on it (they can provoke electricity breakdowns from the motor installed in the fan), you can get injured or electric burns when you touch the metal case of the hood. Modern cooker hood connected to the mains using 3 wires (ground, neutral wire, phase). To eliminate the likelihood of injury, you need to carefully take care of the grounding.
At the moment, ground loops and euro sockets are being installed in new houses, and this ensures reliable safety against electrical injuries. However, in most houses such circuits are not installed, therefore, in order to avoid breakdowns, grounding work is required. To do this, you do not need to dig trenches and carry out other capital work. Moreover, there is no need to ground the hood to heating, water or gas pipes, because this option can provoke even greater troubles. It is necessary to choose a neutral (unrelated) grounding method.
To do this, it is enough to have access to the electrical panel (be careful, because there is a current with a voltage of 220V). Opening it, you can see with the naked eye that the wires are coming out of the walled pipe. In the overwhelming majority of cases, a pipe with a thread or a threaded bolt applied to it is placed on it, to which other wiring is likely already connected, providing grounding of other devices. Having stretched a flexible wire with several cores from the kitchen hood, it must be connected to this bolt. After connecting the ground wires from the hood to this bolt, you can be absolutely sure that the current will not break through the metal circuit of the installed product. If there is already not enough space on the threaded tube for connection, in no case should one of them be disconnected, this is very dangerous for you and other family members. In this case, use the lug and secure the ground wire. If there are no threaded marks on the tube, it is advisable to use a clamp to secure it securely.
Which duct to buy and where to connect it?
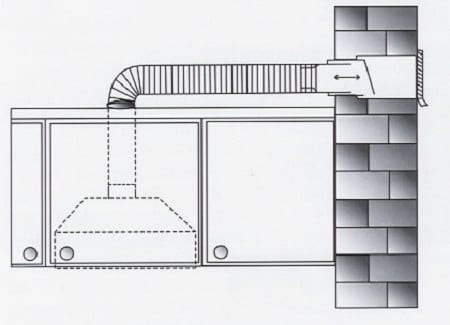
An ideal duct would be a corrugated aluminum pipe. When buying, you need to choose a pipe diameter that will be approximately equal to the diameter of the upper hood on the hood.
The most obvious solution for connecting an air duct is to lead to a ventilation pipe or directly outside the dwelling by making an opening in the wall. However, these methods are not the most optimal. In the first case, when the stove releases a large volume of burned gas with all the burners working, as well as steam from the food being cooked, the air duct may simply not be able to cope and some of it will scatter around the dwelling or get to neighbors.

With a strong wind outside, with such a connection, the hood may turn out to be completely useless, and all the secretions can return not only to your kitchen, but also to the neighbors' premises by means of the hood, which obviously will not please them. In the second case, questions of a constructive nature arise: breaking through a wall is not an easy task, and besides, this requires permission from the relevant authorities, because the wall is load-bearing. At the same time, a large amount of condensate will settle in the duct, which can certainly lead to a breakdown.The best option is to perform an additional section of the air duct with the installation of a flap valve.
Installing a check valve - crackers
To install a cracker valve, you need to take into account several mandatory, fundamentally important explanations:
- Most often, the hood, which is planned to be used under the duct, has an aspect ratio of 3: 4. The diameter of the duct pipe is acquired with a value that should be approximately equal to the larger side. In this case, the hood will be completely closed, and installation will not cause any trouble.
- The cracker flap should be made of lightweight material. A sheet of fluoroplastic with a thickness of 0.5 mm or tin is best suited. The lighter this flap is, the more effective the clapper will be.
- A thin and weak spring must be attached to the damper. This will ensure its unhindered opening and smooth return to its original state. Therefore, stiff springs are highly discouraged. Recommended sizes of the spring material and its dimensions: wire - 0.2 mm; diameter - up to 5 mm; length - up to 1.5 cm.
Filters or odor neutralizers in the cooker hood
There are 3 types of neutralizers on the modern market, each of which has its own advantages and disadvantages.
Chemical neutralizers do the job well. However, if we take into account that fat settles in the hood, which also covers the active elements, it will not last as long as prescribed in the warranty period of operation and it is almost impossible to calculate it. Therefore, they will have to be changed very often.
Electroionization neutralizers operate in the same way as standard air ionizers. But in terms of power, it surpasses the room sample, because the concentration of steam is several times higher than in residential premises. This creates a fairly voluminous magnetic field, which is higher than permissible standards.
Ultraviolet neutralizers solve the problem of both cleaning and lighting the built-in cooker. They do a good job and are completely harmless. But the lamps require periodic cleaning of grease, and they need to be replaced every 2 years, which will significantly hit the pocket, because they are not cheap.
A few tips for installing a hood
In order to carry out the installation of the hood, you need tools that are available to almost every owner. An exception is the jigsaw, which can be bought or rented.
Installing a cooker hood begins with making a cracker box. The most suitable material for the manufacture will be tin plate, galvanized or thin aluminum plate. Then, at the place where the cracker is attached, draw a pencil around the contour for subsequent installation and fixing with polyurethane foam. ( See also: DIY kitchen hood repair )
Empty the cabinet above the stove. Calculate as accurately as possible the area of the hood and use a jigsaw to cut the same size in the bottom of the cabinet. It is best to attach a hood and outline the outline on the bottom shelf with a pencil. There is no need to be upset if the cutout turns out to be not entirely neat and accurate, all the flaws will be hidden and the wardrobe will not lose its attractiveness outwardly. Then, having freed the cabinet from the shelves, you need to cut the holes for the air duct. In the upper part of the cabinet, you need to make a hole for the cracker, where the width and height should be 3-5 mm larger.

Then you need to fix the hood to the bottom of the cabinet using self-tapping screws. Next, we fix the corrugation to the hood. There is no need to tightly tighten it (this will make it easier to clean the structure later), it will be enough to wrap it with a thin and flexible wire. To connect the hood to the mains, you need to take care of the cable routing in advance. If the connection is through an outlet, the wire can be skillfully hidden behind furniture fixtures.If a direct connection is planned, it is necessary to place a box in which you need to put the wires and connect them to the mains.
Advice:
If you do not know how to install a cooker hood, it is best to consult a specialist and study the tips given above.
Each specialist performs the operations of fixing the hood individually, according to his taste. However, it is worth considering that all operations must be carried out carefully, everything must be calculated to the smallest detail and try to allow the smallest error.
Hood maintenance
The hood must be cleaned of soot without fail. This step is necessary for several reasons:
- The efficiency will decrease, because the duct, fan, etc. will be clogged with soot. This will lead to the fact that some of the fumes will enter the living quarters, which will cause discomfort.
- Due to the soot, which will settle on the walls of the duct and working parts of the hood, the probability of ignition of the hood increases. This fact is especially relevant, because in this case, housing can burn completely.

The recommended interval between each maintenance is about six months. This will require an almost complete analysis of the design. Each, separately taken, part of the structure must be thoroughly cleaned of soot, lubricate the fan, check the electrical connection.
See also: