Before you do something yourself, you need to decide which type of stove you will work with. Electric stoves are produced in several versions: ceramic, induction, built-in and others. They also differ in the types of burners built into the stove: express burner, automatic burner with a white circle, ordinary cast-iron burner. When you choose the option that is best for you and buy it, then you can already start connecting the electric stove.
Electric stove installation process
Whatever you do, the most important rule when installing a stove is to turn off the electricity. Such a trifle can easily fly out of your head, but the consequences will be dire if you do not remember this little detail in time.
Required tools. In order to complete the installation of the electric stove, it is recommended to acquire some tools, namely:
- A screwdriver. Its purpose is to attach wires to terminals.
- Indicator. The device checks whether there is a phase in the network or not.
- Electro probe. They are looking for a "zero wire".

Determine the power of the electric stove
What to do next if you decide to act on your own? Find out the power of your electric cooker.
Small-sized electric stoves, which have a power of no more than 3 kW, will be correctly connected using a plug and socket with a current of 13A. Adapters and fuses are sometimes required.
If the current power of the electric stove exceeds the value of 3 kW, then it should be connected to radial circuits. A chain is a wire that is connected to a distribution board. Further, at a distance of about 2 meters from the stove, a connection block is installed that connects the shield and the electric stove.
Dashboard information
It is worth mentioning separately the shield. Check the standards yourself that are specified in the instructions. The cable must have 3 veins, and the copper cross-sectional area must be at least 4-6 sq. Mm. If not, then replacement is required. The current should be approximately 40-50 amperes.
Pay attention to the shield model and its characteristics. In this case, the letter "L" is the phase, the letter "N" is zero, respectively, and the ground is "PE".
Installing the stove in a single-phase network
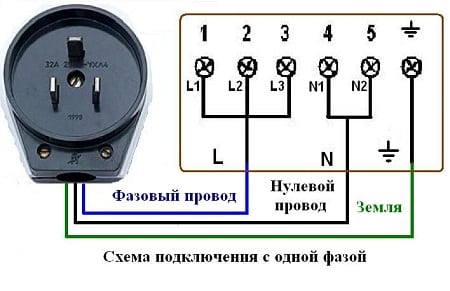
If the network is single-phase, then the correct sequence of actions will be as follows:
- We install and mount the socket with 3 contacts.
- We attach a power plug to the wire. The wire has 3 veins, the plug has 3 pins.
- The wire is connected to an electric stove and plugged into an outlet.
- The electric stove is set on a level.
- We check the work of the stove.

Working with a three-phase network
- Often this situation is observed in country-type houses. In this case, how to properly connect the electric stove? In advance, a switch is built into the wall, which contains 3 poles. The markings on the cover of the plate itself, the inscriptions on it, will tell you how to position the outlet. In any case, in relation to the wall, it should be placed horizontally.Then we make the connection according to the colors of the wires. You will do everything right, guided by the principle that the colors must match each other.
- It is necessary to buy an outlet with such a current strength with which it will most safely function with the stove. The number of amperes that the electric stove consumes is calculated by the formula: the power of the stove is multiplied by 1000 (that is, the number is simply converted from kilowatts to ordinary watts), and then the resulting value is divided by the mains voltage.
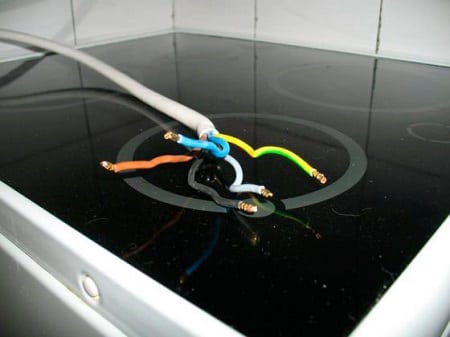
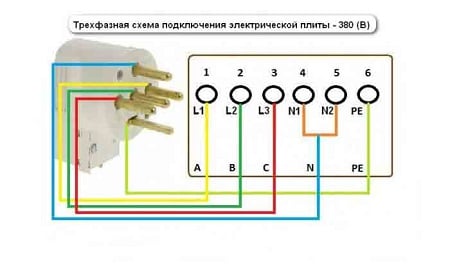
- In order for the network to be loaded evenly, a copper five-core wire is laid in the electrical panel. It is adjoined to the socket and plug by means of the "PVS 5x2.5" cable. The factory-installed jumper is removed between pins 1,2,3. They are connected to opposite phases L1, L2, L3. Zero is attached to pin N1, N2, and ground is connected to the remaining PE pin.
- Often, an installation diagram is attached to the electric stoves, where everything is correctly and correctly painted. With her it will be much easier to figure out how to connect the electric stove yourself.
- Check, again, the work of the stove.

Useful tips on how to install an electric stove in an apartment:
- It is not recommended to dispose of the packaging prematurely. If the product is defective, this will give you the opportunity to exchange it.
- Inspect the electric stove to make sure there are no scratches or chips on it.
- If the apartment has old wiring and aluminum wires are used there, they should be replaced with copper ones yourself.
- A separate wire is laid from the panel to the outlet, designed to connect only the electric stove.
- To avoid unpleasant situations when installing the stove, use a rubber mat under your feet.

