Often, during the washing process, the machine begins to emit incomprehensible sounds, and strong vibration also occurs. Such phenomena can be caused by a small object hitting the drum units. Most often these are bones from underwear, hardware, buttons and buttons. Such a trifle can cause serious damage. As a rule, first of all, the drum oil seal, the drum itself or the washing machine tank are damaged.
Is it possible to solve the problem
If something gets caught in the drum unit, it can cause the washing machine to stop and break. To remove the debris, it is necessary to disassemble the unit. However, it is worth considering that there are some nuances. Remove the drum very carefully so as not to touch other parts of the device. As a rule, professional craftsmen are engaged in such repairs. If it is not possible to turn to specialists for help, then you can try to solve the problem yourself. The main thing is to adhere to the recommendations described below.
![]() See also - Washing machine water temperature problems: checking the sensor
See also - Washing machine water temperature problems: checking the sensor
What you need to work
To fix the problem, you need to disassemble the washing machine. This will require the following tools:
- Screwdriver.
- Nippers.
- A set of asterisks.
- Ticks.
- A set of screwdrivers and hexagons.
- Ratchet and heads.
- Hammer.
If you plan to replace certain parts, then they should be purchased in advance. It should be noted that it is not so easy to disassemble the washing machine without tools. Therefore, they also need to be prepared in advance.
![]() See also - Washing machine leaks from below - causes and repair of a leak
See also - Washing machine leaks from below - causes and repair of a leak
Dismantling a front loading machine
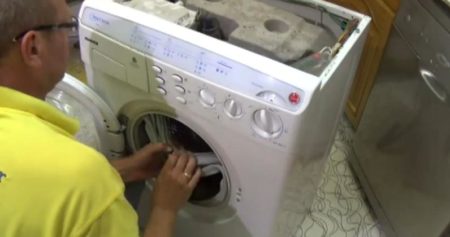
This is the most common modification of washing machines. First of all, the device must be disconnected from the power supply, the drain hose must be removed from the sewer. Only then can you start disassembling the unit. First, it is worth removing the back cover by unscrewing all the screws. The same is required to be done with the front of the device.
 Carefully remove the container intended for washing powder by unscrewing all the hardware. Then you can remove the control panel. You don't have to take it off at all. It is enough to fix it a little to the side so that it does not interfere with work. If you still decide to remove the panel, then you should take a picture in which all the wires and their connections will be visible. Otherwise, you will not be able to connect them correctly.
Now you need to remove the hatch cuff. To do this, just pull on the spring. It is also necessary to remove the bottom panel. All hardware should be unscrewed. The front wall of the unit must be removed together with the hatch. That's all. The unit is disassembled. Now you need to remove the tank.
How to remove the tank
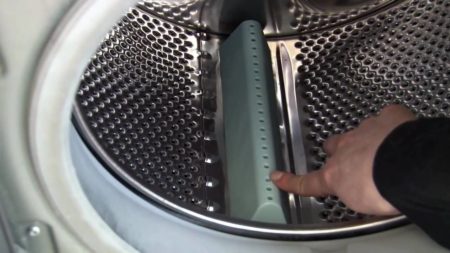
First of all, it is worth disconnecting everything from the tank: shock absorbers, wiring, pipes, counterweight. Unscrew the central bolt located on the motor cover. In this case, you must hold the drum itself with your hand. Then you can remove the washing machine motor.
 It should be noted that removing the drum is a complex procedure that cannot be rushed. In this case, it is necessary to unscrew all the hardware and carefully remove the drum so that the parts of the device located next to it are not damaged.
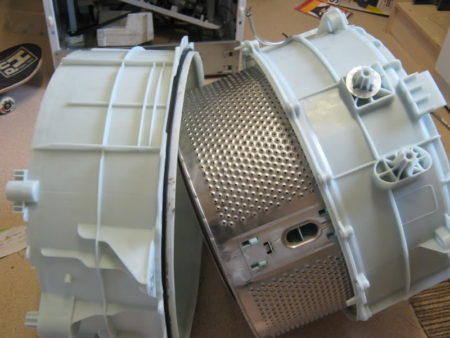
Once removed, the tank can be disassembled into several parts. It is worth noting that in many cases its parts are glued together very reliably and firmly. Even specialized services refuse to repair certain models of washing machines because of this feature.
![]() See also - Washing machine tank repair: repairing a leak
See also - Washing machine tank repair: repairing a leak
If the top-loading machine
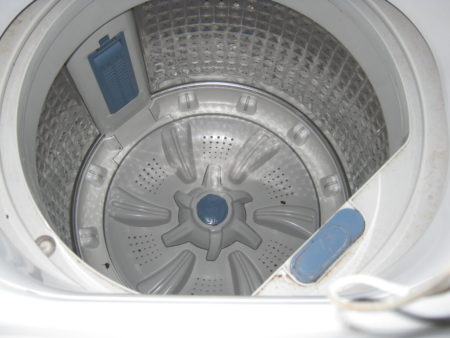 Top loaders offer several advantages. First of all, they are easy to use and easy to download. In addition, the drum of such models is fixed in two places. This significantly increases the service life of the device. This technique is understood as follows:
- It is necessary to unscrew all the hardware located on the front and rear walls.
- The right side panel should be pushed back a little and then carefully removed.
- After that, you need to disconnect all the wires and remove the hardware located around the plastic cover.
- The same must be done with the second side.
- After that, you need to unscrew the hardware that holds the shaft.
- That's all. It remains to close the tank doors, and then remove the tank itself.
In the process, it is worth taking pictures so that you do not get confused when assembling the unit. If the plastic cap is soldered, you must pull it towards you and then cut it with a drill.
See also:
- 6 best Bosch washing machines according to customer reviews
- 7 best Indesit washing machines according to customer reviews
- 7 best LG washing machines
- 7 best Gorenje washing machines according to customer reviews
- 7 best washing machines under 20,000 rubles according to customer reviews